
 (1)")
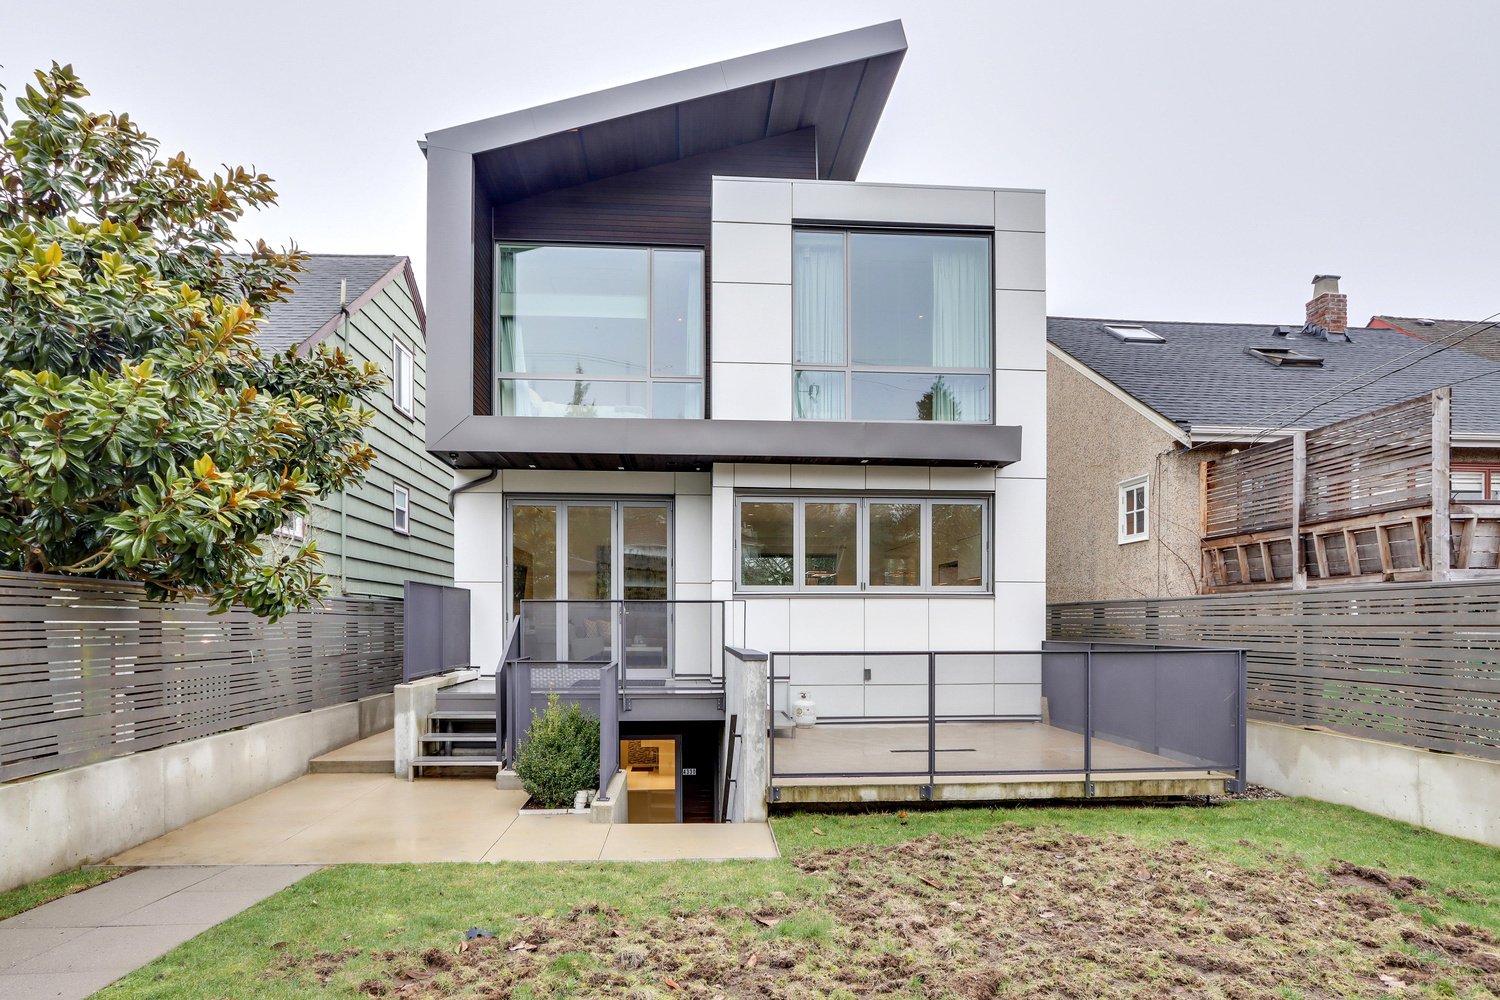
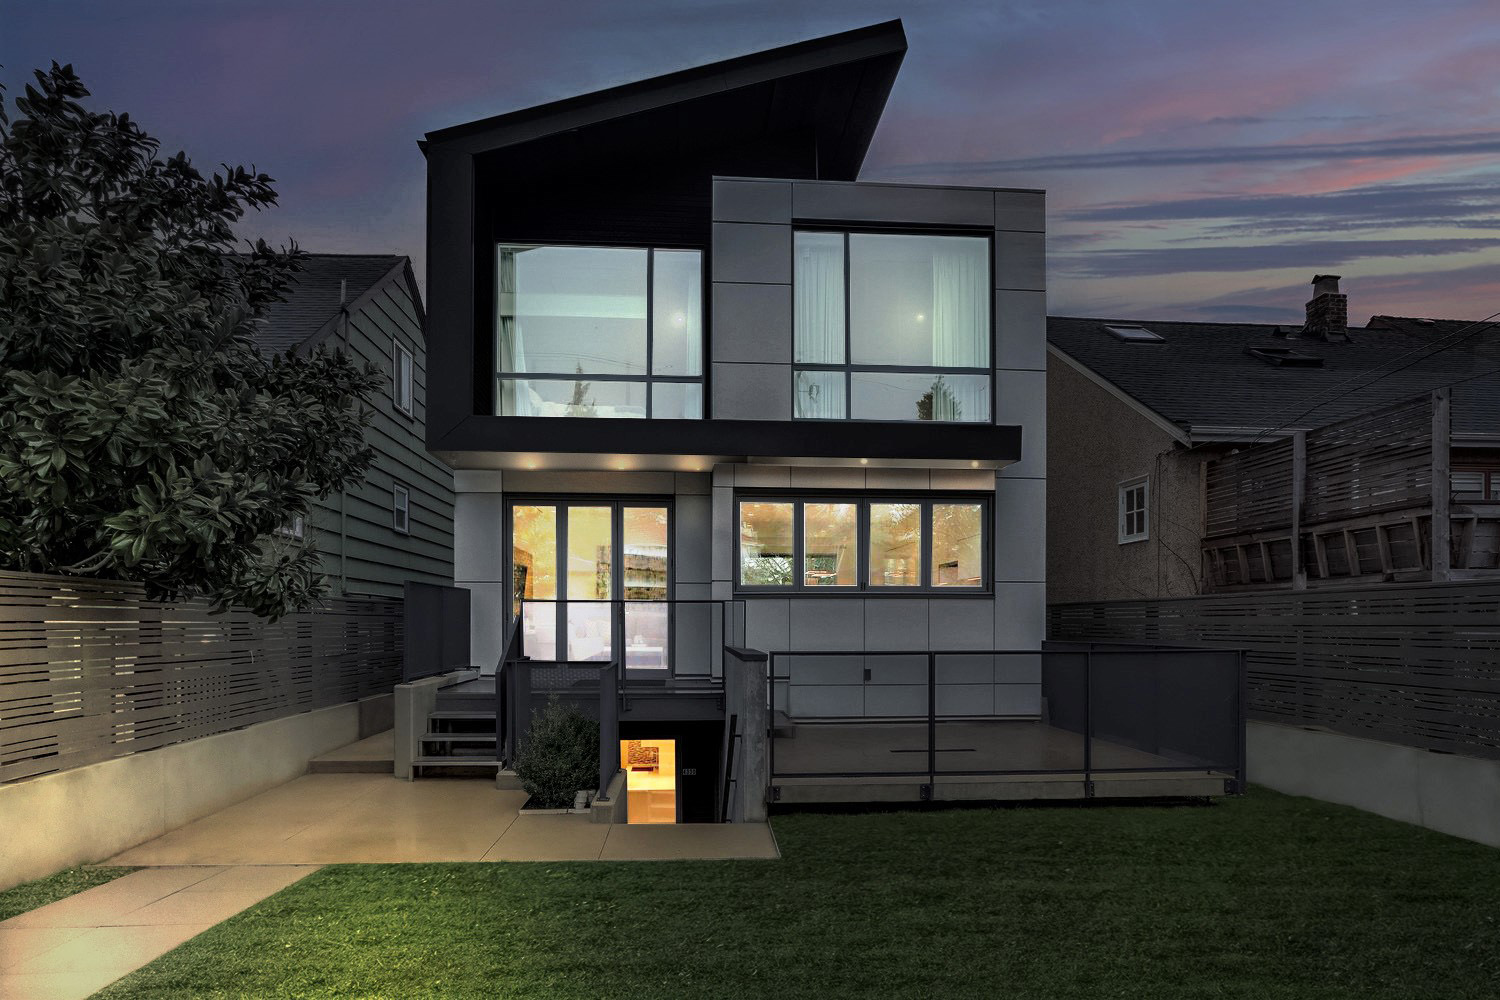
Today, due to the widespread growth of the real estate industry, real estate photo editing services have received more and more attention. One of the most used and demanded edits in real estate is the day to dusk photo editing service. Some photographers are looking to modify photos from day to night or dusk. Real estate photos are usually taken during the day for better quality, and real estate photographers avoid night photography because the image quality would not be as good as editing using Photoshop. This improves the quality of the view and saves time. In the following, we will talk about what to look for when virtually creating twilight photos and how to change day to dusk.
Photographers and real estate agents are able to convert their property images from daytime images to dusk or vice versa by using day to night digital conversion that can be easily done by Photoshop software. The day to night conversion can be done with a combination of several different techniques. It should be noted that if the photo is not converted professionally, it can easily throw off the potential buyers. In the day to dusk conversion technique, attention to detail is crucial.
To order day to dusk at unbeatable price click below!
Table of Contents
Enhancing twilight
Customer needs should be considered when editing photos. When a buyer likes to see the property in the evening, they are also likely to be curious about seeing the property during dusk. For enhanced twilight photos, the day to dusk conversion method may be different. There is a need to increase the flexibility of the image in this case, nor to turn on more lights inside the house.
Sky replacement
The change of the sky from a bright sunny day to a dark star night and vice versa is the biggest conversion that could happen. Photographers usually take photos of the property in daylight. Sometimes using a brush tool or a stock photo stitching technique from the night sky can do the job. When performing a sky replacement, always remember to lay the sky foundation first. Clouds and celestial bodies must come after so that they can be completely added.
Shade correction
Because shades are cast during daytime photography, the day-to-night conversion method needs to remove these shades and find the source of the artificial light that may create them instead. Real estate photo editing services should provide what the customer wants as well as make it real.
Color/perspective correction
These two basic requirements must be considered in real estate photo editing services. As the photo changes from day to night, the colors need to be corrected. Suppose that the sky is changing, which can solve the required color corrections in that part of the photo. Yet, this property may be contaminated with color casts that dislodge the structure. Also, be cautious when using wide-angle or fisheye lenses as they create curves around the edges and corners and even inside the image.
Overlays
Real estate photo editing services should take into account that customers want to know that how inside the house looks like at night. In this case, we must know how to change day to dusk. Therefore, overlays should be considered in the day-to-night conversion method. Overlays on fireplaces and screens make you want to stay home and appreciate the warmth and coziness.
HDR photo editing
HDR photos can be of great use to day-to-night conversion methods. HDR shots that are taken in the evening produce a range of different exposures of an image, with one providing visible views of the night sky and the other providing visible property. By stitching them together you can create a picture in which editing can begin and move on to other steps.
Add the moon and stars
This is suggested as a subsequent procedure. The goal is to add them to stock images or clone them from another image. Note that this step cannot be omitted because a bland night sky plunges the property into a dark abyss and reduces its appeal.
Eliminate sensor spots
In many images, there are usually sensor spots that emerge as a round opaque, and translucent objects floating around. While cameras that come with a tone of complex features have sensor spot removal abilities, being careful during the editing phase pays dividends especially when it makes the photo looks extra elegant at night. This elegance feature elaborates on how changing day to dusk is important for photographers.
Remove unwanted objects
When shooting, there are always specific elements or objects that are captured by photographers. Removing or hiding them using different photo editing methods can shift the focus on the property and increase the attractiveness of the photo.
Retouching
The last step is retouching. Day-to-night conversion methods and learning how to change day to dusk, help with a lot of background editing and replacement. A large number of variations may overcome efforts to assure that items added in or layers unmasked appear seamlessly throughout the image. You need to carefully remove spots and imperfections to create a perfect image.
To order day to dusk at unbeatable price click below!
Using Photoshop to Create Day-to-Dusk Images
The next step is to demonstrate how to change a picture from day to dusk in Photoshop.
Open the windows:
- Take your photo into Lightroom for some simple editing.
- It should be made a little darker, as this is a dusk image.
- Make a virtual duplicate.
- Alter the window glow on that copy to make it seem the light is on.
- Increase the light intensity and temperature to get a luminous effect.
- Transfer the images to Photoshop.
- Create the window layer in Photoshop and add an inverted mask to the top (Press and hold the ALT key while clicking the Masking button).
- Use the Pen tool (P) to select the windows, and then click the Delete Button.
- Use the Layer style to implement an Outer Glow.
- Use the sliders within the Layer Style to the proper setting.
Edit the sky:
- Make a copy of the basic image.
- Duplicate the blue channel from inside the Channel panel.
- Press CTRL – L on your keyboard and change the Sky levels.
- To brighten the sky, select the non-sky areas, make them dark, and then use the Dodge Brush (O).
- Click the Masking button after loading the channel as a selection.
- Import a shot of a twilight sky to use as a backdrop for the building.
- Adjust its placement and ensure that it is harmonious with the home. For example, you might use the Burn tool to darken the whole home.
- Save your new image.
- You can make one or two white balance tweaks in Lightroom until you are satisfied with the final image.
If you lack time to edit your day-to-dusk photographs, you can outsource the task and rely on the expertise of skilled photo editors. The real estate editors can help you with:
Color and tone improvements
Image enhancement
HDR editing
Decluttering and item removal
Window masking and glare mitigation
Line and angle adjustments
Conclusion
By using currently known techniques and learning how to change day to dusk, real estate photo editing services can be performed for day to night conversions. When real photography is not able to capture the evening view, the day-to-night editing technique can present what potential buyers are looking for.
FAQ
Generally, a twilight photograph is taken of the outside of the property at nightfall. Its purpose is to draw attention to certain aspects of a landscape or property for sale. In the dusk, the sun’s rays become warmer, bringing out the colors and bathing the scene in a golden glow that makes everything appear “picture perfect.”
Using picture editing software such as Photoshop and Lightroom, you can alter your twilight photographs. All you have to do is take high-quality photos and use these programs to alter the color of the sky and tweak the lighting.